Burst Super-Res: The What, Why, and How
2388 words12 min readSpencer Kittleson
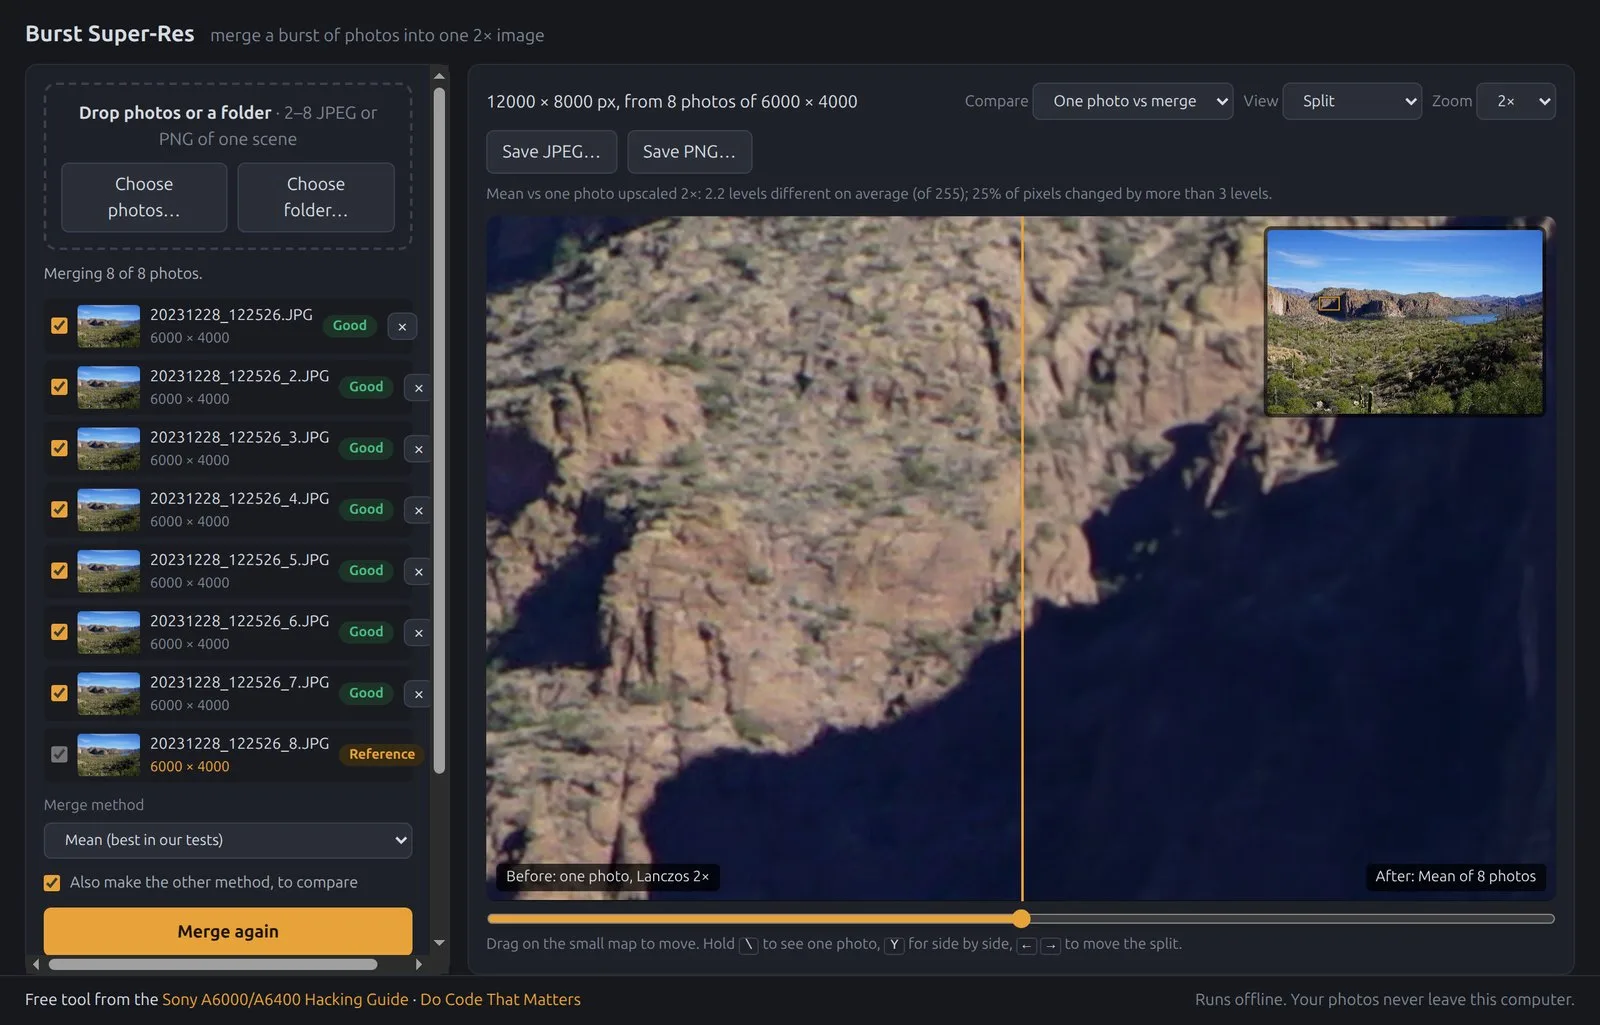
TLDR; Out of 8,809 Sony photos in my Immich library, exactly one burst was steady enough to merge cleanly. That one number changed what the app had to be. Burst Super-Res is free, runs offline, and you can download it here.
Sony A6000/A6400 series: Part 1: Modernization · Part 2: More Hacks · Part 3: Tethered Raspberry Pi · Research & Community Resources · Burst Super-Res (this post)
What it is
You drop in a burst of photos of the same still scene. The app aligns them to a fraction of a pixel, merges them, and gives you one image with twice the width and height. Four 6000 x 4000 photos become one 12000 x 8000 image. It reads JPEG, PNG and Sony ARW (RAW), keeps your EXIF, and shows you a split slider so you can see what the merge actually did.
What you get is less noise and cleaner fine edges. You do not get 4x the detail, and the app never claims a megapixel number because of that. On simulated bursts with a known answer the gain over one upscaled photo measured +0.7 to +1.3 dB PSNR. Real, but modest. I’d rather put that number on the page than a “96 MP!” badge.
Why I built it
Chapter 7 of my Sony A6000/A6400 Hacking Guide is about super-resolution from a burst. The original method is a few lines of Python and OpenCV in image_utils.py from my old dslrCameraPowerRename repo:
- Take 4 pictures with the Smart Remote API
- Upscale each one 200% with Lanczos
- Align them
- Blend two at 50% transparency
- Blend the two “super images” into a “super super image”
On paper that’s (24.3 x 2) x 2 = 97.2 MP. In practice it looked more like 48.6 MP. It worked for me, but nobody reading the guide was going to set up a Python environment for it. I wanted a free tool people could just download, that points back to the guide, with no nag screens.
How it got built
I wrote a one-page brief and handed it to an agent in opencode. The brief had the algorithm, links to the chapter and the Python code, a real 24 MP A6400 test photo, and a few constraints I cared about more than any feature:
- Honest claims only. No “AI”, no inflated megapixels, and say plainly that it needs a still scene.
- Measure on real data and report the numbers, not guesses.
- Use tinyjs so it runs on macOS, Windows and Linux.
- Commit locally. Do not create a remote or push without asking me.
The first working Linux build, with unit tests and a benchmark table, landed about an hour after the first prompt. Everything after that was me steering with short messages over about two days. My actual prompts were things like “Look for images in my homelab immich”, “Make sure a mac, windows, linux version is available in a github release”, and my personal favorite, “Shoe mr one thr images” (it figured out I wanted to see the before/after). That session was about 20 messages from me. The opencode session record puts it at about $45 and 470k output tokens. A second, shorter session later added parallel workers and took 19 minutes.
The first surprise: the original method is just a mean
Working through the math, the pairwise 50/50 blend from my guide turns out to be a plain average with extra rounding. For 4 photos you blend A+B, blend C+D, then blend those two: every photo ends up at 25%. That’s a mean, but rounded to 8 bits after each stage. For 3 photos it’s worse, because the weights come out 25/25/50.
So the default became a per-pixel mean (or median) over all aligned photos, with exact weights for any count. The pairwise mode is still in the app so you can compare against the original.
The bigger change was the alignment. My Python version matched SIFT features and fit a homography. The app uses sub-pixel registration: an image pyramid, Lucas-Kanade on tiles, then an affine fit through the tile shifts. On simulated bursts it lands within 0.03 px, including bursts rotated 0.5 degrees.
Dead ends worth knowing about
The early numbers were quietly wrong. The benchmark used jpeg-js to decode, and its decoder truncates instead of rounding. That shifts every pixel by -0.53 levels on each round trip, which quietly skewed every PSNR number. Switching the harness to libjpeg-turbo’s djpeg/cjpeg fixed it, and every number in this post comes from that.
True shift-and-add got dropped too. It places every input pixel at its exact sub-pixel spot on the 2x grid. On synthetic test patterns with heavy aliasing it beat the mean by 1.0 to 1.7 dB. On real photos it tied the mean, and on a detailed landscape crop it was 0.2 to 0.5 dB worse. Out it went.
My photo library said handheld is the real problem
The first version only had simulated bursts to show off, so I told it to look in my Immich server. It used my logged-in Chrome session, read-only, and pulled metadata for every Sony photo: 1,880 from the A6400 and 6,929 from the A6000. It grouped shots taken seconds apart with identical settings into 732 burst candidates, downloaded previews, and ran the app’s own alignment over 348 of them.
302 were handheld, more than 10 px off. Exactly one was steady: a 13-shot A6000 canyon burst (20231228_122526.JPG, 20 mm, f/11, ISO 100). That’s the photo at the top of this post. Even that one had 3 frames that didn’t line up well enough for version 0.1.
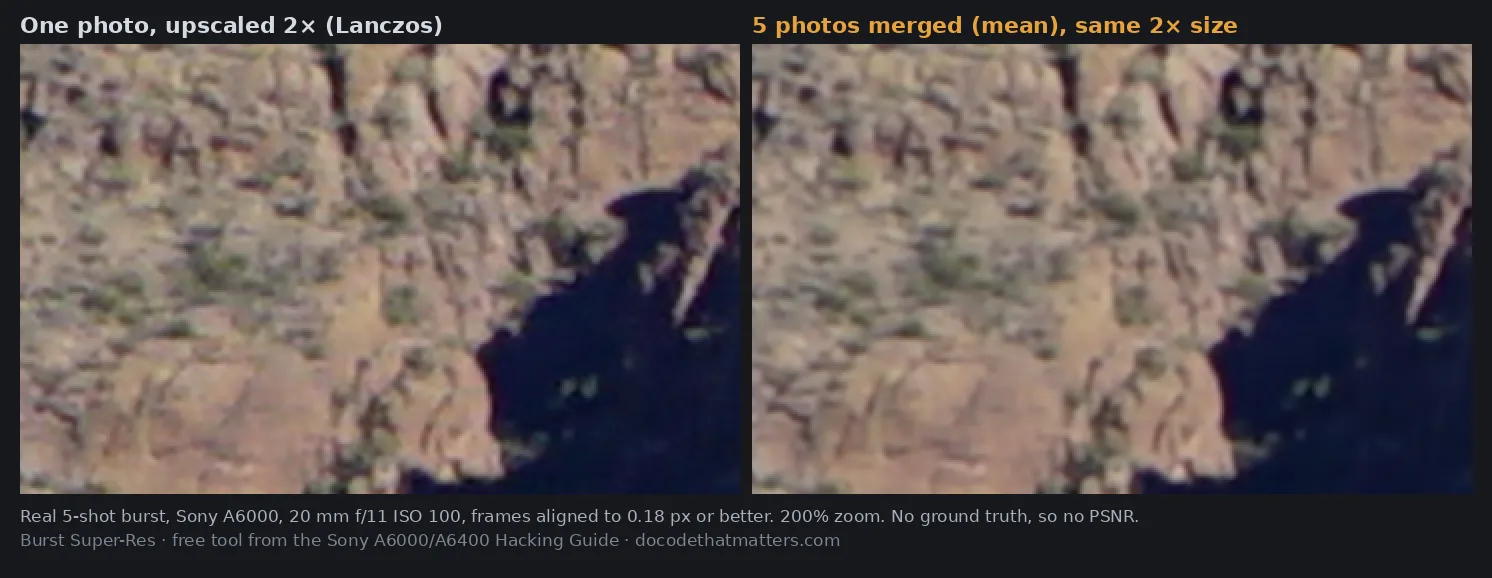
That’s 302 of 348 bursts shot handheld, from someone who wrote a guide on this. A tool that only works on a tripod is a tool for almost nobody.
Borrowing from tools that already solved this
Before building more, I had it research how comparable tools handle this, using DuckDuckGo. The useful finds:
- DeepSkyStacker scores every frame and stacks only the best ones. My app was warning about bad frames and making you untick them by hand.
- Lightroom uses
\to toggle before/after andYfor side by side. Photographers already know those keys. - Topaz Gigapixel compares multiple results with one shared navigator.
- Sony’s own pixel-shift workflow tells you the shooting rules and the wait time up front.
- Google’s Handheld Multi-Frame Super-Resolution (Wronski et al., 2019) treats hand tremor as the source of the useful sub-pixel shifts, as long as you align each region on its own.
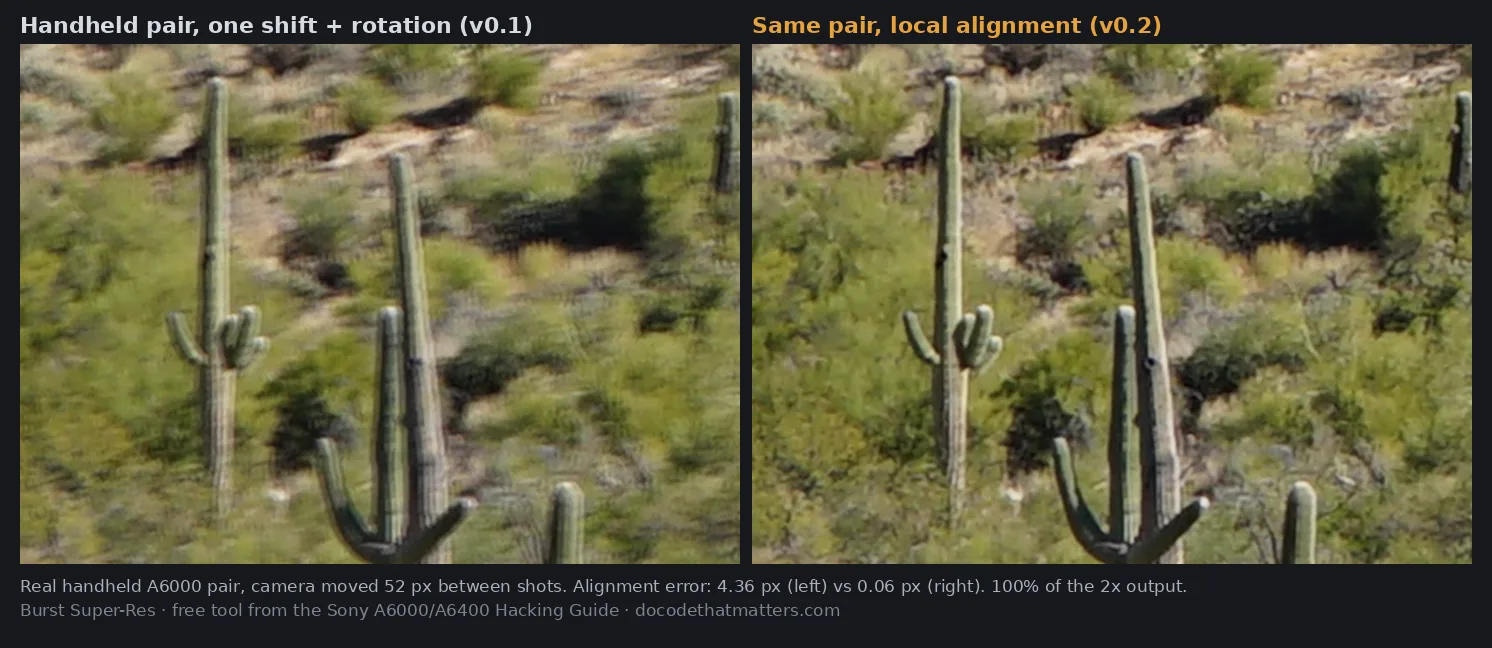
That last one changed the plan. Version 0.2 added local alignment: when the global fit is worse than 0.1 px, a grid of 64 px cells gets measured and corrected on top of it. On a real handheld pair where the camera moved 52 px and the near cactus and far hills shifted different amounts, the error went from 4.36 px (a doubled cactus) to 0.06 px. All 8 canyon frames came in at 0.22 px or better.
It also picked up the Lightroom keys, Good/Soft/Too far off badges per photo, automatic unticking of bad frames, and masking of 64 px areas where something moved (water, leaves, people) so they don’t ghost. When a burst really is too far gone, the app says so instead of pretending:
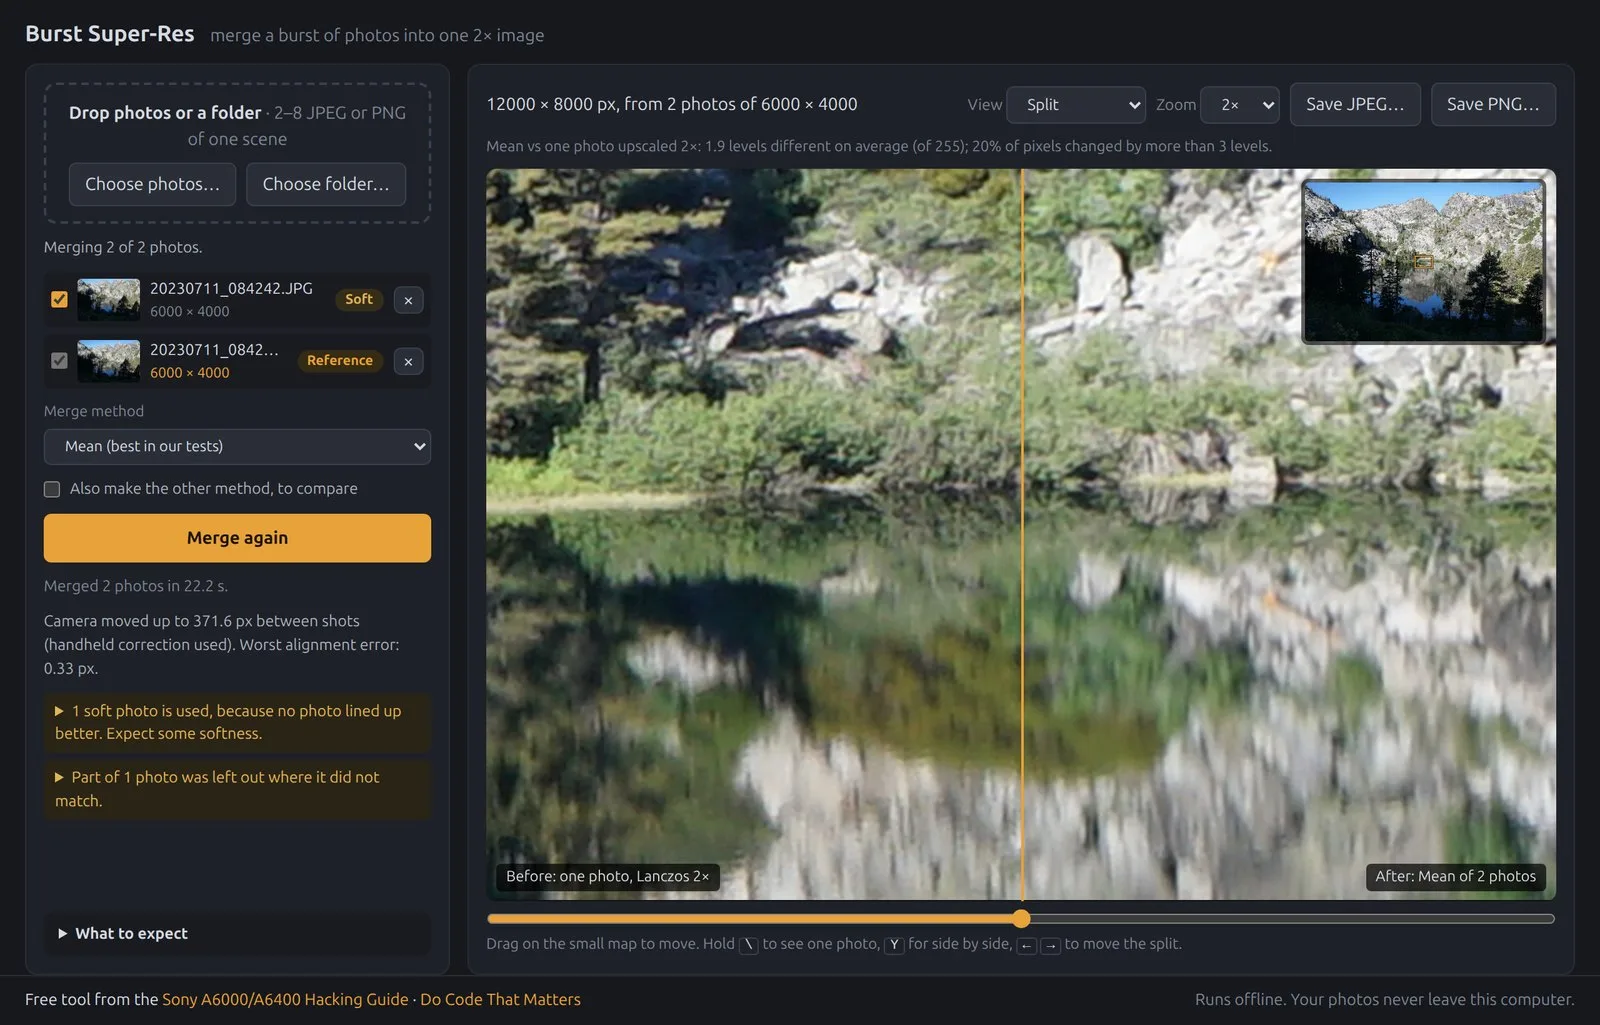
The research round, and what actually measured better
Then I asked whether there was research on better alignment and stacking. There’s a lot. What mattered was that it measured the cheap ideas on the existing benchmark before recommending anything.
| Method (4-frame simulated burst) | A6000 landscape | A6400 photo (mostly out of focus) |
|---|---|---|
| One photo upscaled 2x | 33.51 dB | 38.60 dB |
| Mean merge | 34.58 dB | 39.84 dB |
| Mean + gentle deblur | 35.54 dB | 39.79 dB |
| Sigma-clipped mean | 34.48-34.54 dB | 39.77-39.82 dB |
| Deblur on one photo alone | 32.69 dB | 37.56 dB |
Deblurring only helps after the merge, which matches the two-step approach in Farsiu et al., Fast and Robust Multiframe Super Resolution (2004): stacking lowers the noise enough for deconvolution to work. On a single photo it made things worse. Sigma clipping, the astro stacking staple from Siril, didn’t help here because the per-area masking already handles moving things.
That turned into three features in v0.3:
- Sharpening after the merge. A gentle Richardson-Lucy deconvolution (Clarkvision compares it against unsharp masking on real photos: part 1, part 2). “Auto” picks the amount by leaving one photo out of the merge and choosing whatever predicts that photo best. It’s off by default for camera JPEGs, because they’re already sharpened in camera and Auto measured up to 0.9 dB worse on those.
- Brightness matching. Exposure flicker gets measured per photo and colour and evened out. With ±5% simulated flicker it recovered the true gains to within 0.001.
- RAW (Sony ARW). Wronski’s point is that a camera JPEG has thrown away the fine aliasing detail super-resolution needs. So with 6 or more ARW files, every output pixel gets built straight from the raw sensor samples of all the photos, no demosaicing in between. The decoder was written from scratch and matches LibRaw on all 24.2 million samples of a real A6000 ARW. In simulations RAW scored 0.9 to 2.5 dB better than merging the same burst as JPEGs.
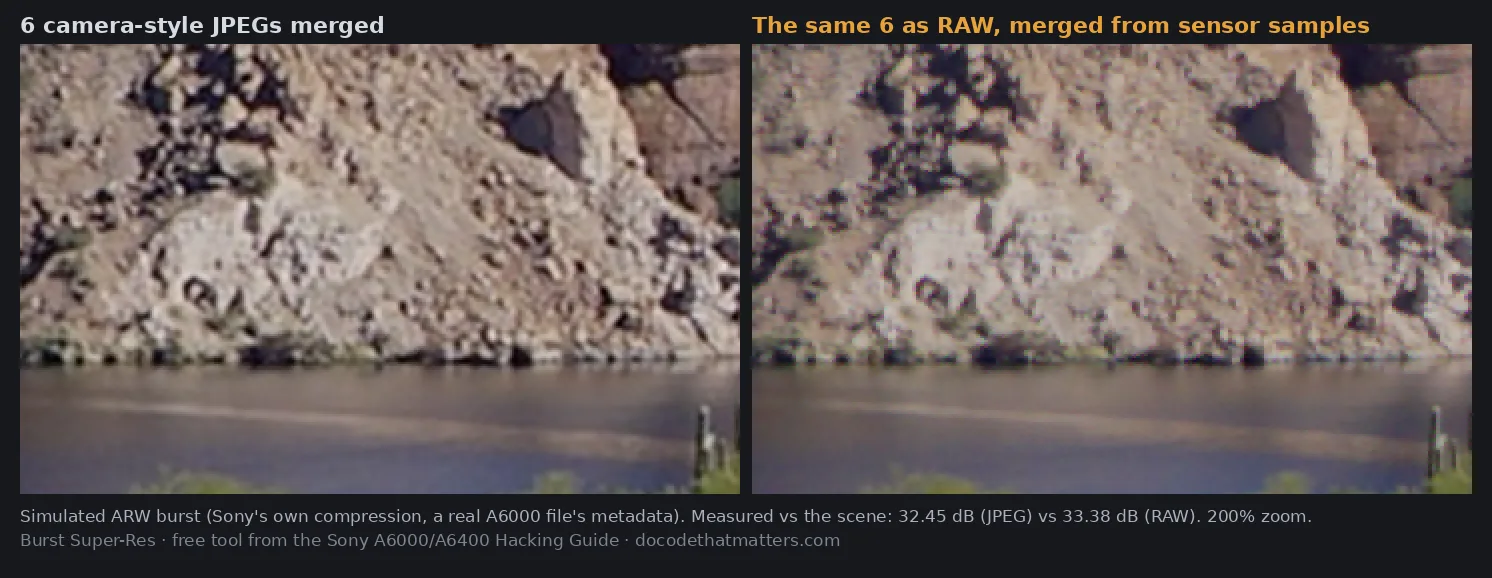
I have exactly one real ARW to test with, and no real RAW burst. So every RAW quality number above is from simulated bursts, and the README says that.
What it didn’t adopt: deep-learning burst SR like Deep Burst Super-Resolution (Bhat et al., 2021) and Burstormer (2023). They top the benchmarks, but they invent detail and need a big model or a GPU. That breaks the “no AI claims” rule and the offline app. If you want to go deeper on the classical side, the IPOL re-implementation of Google’s method (Lafenêtre, Facciolo, Eboli, 2023) walks through every step with its own measurements, and CANDID covers optical-flow alignment for scenes with a lot of depth.
Where the pixel work runs
tinyjs apps have two halves: a txiki.js backend and the OS webview (WebKitGTK, WKWebView or WebView2). The backend runs QuickJS with no JIT, and a tight numeric loop over 96 MB of pixels per photo is exactly where a JIT matters. So all the math runs in the page, in a Web Worker, and the backend only writes the output file.
One gotcha: Chromium (which WebView2 uses) blocks workers loaded from file:// URLs, so the worker gets built from function source as a Blob URL. The output goes back to the backend in 3 MB base64 chunks because the bridge is text.
The latest change spreads alignment and merging over a pool of helper workers. Four real 24 MP JPEGs went from 31.5 s to 14.1 s on my 24-core machine, and the output matches the single-threaded version pixel for pixel. That one is committed but not in a release yet as I write this.
Shipping it
Getting it into a GitHub release turned into more cleanup than code. Before the first public push, the agent stopped and asked four questions: public repo or not, what to do with the brief (it had my marketing notes and local paths), Mac signing, and which tinyjs version CI should pin. The brief got purged from every commit before the push.
The lockfile didn’t. The first CI run failed on npm ci, and the reason was that package-lock.json pointed at my work’s private npm registry, AWS account ID included. The repo had been public for about five minutes. It asked before rewriting history and force-pushing, I said yes, and a repo-level .npmrc now pins the public registry. Check your lockfile before you open-source a side project from a work laptop.
The rest was the usual CI whack-a-mole: the tinyjs installer needs WebKitGTK on Linux runners, the WebKitGTK install hung once for 13 minutes, and GitHub retired the macos-14 runners mid-release. Linux also gets AppImages, built in the release job.
Releases are signed two ways: GitHub build attestations for every file, and a GPG signature on the checksum file and the AppImages:
gh attestation verify burst-superres-0.3.1-linux-x86_64.AppImage -R skittleson/burst-superres
gpg --import signing-key.asc
gpg --verify SHA256SUMS.txt.asc SHA256SUMS.txt
I picked the GPG option knowing it meant a project key generated on my machine. The part worth knowing if you hand this to an agent: the key has no passphrase, so the workflow can sign without anyone typing one. It’s protected only by the GitHub secret and file permissions, and the agent said so in its report instead of burying it.
The macOS and Windows builds are not signed by Apple or Microsoft. Mac needs the $99/year Apple Developer Program. For Windows it suggested Azure Artifact Signing at $9.99/month, or SignPath for free if the repo gets an open source license. I skipped both for now.
What’s left
I have only run it on Linux. The macOS, Windows and Linux ARM64 builds come out of CI and nobody has launched them yet. If you try one, open an issue and tell me what broke.
The open item that matters most is a real tripod burst on the A6400 in RAW, 6 to 8 frames. That would replace the simulated RAW numbers with real ones.